
Heat transfers have become a trusted method for apparel decorators and small businesses that want high-quality, durable, and vibrant results without the heavy setup demands of traditional screen printing. But achieving professional-grade outcomes isn’t just about having a reliable transfer—it’s about how well you prepare the garment and workspace before pressing. Even the best transfers can fail if fabrics aren’t properly treated, presses aren’t set correctly, or handling is careless. For decorators who want to maximize consistency and durability, understanding preparation is essential. If you’re exploring how to get the best performance from custom heat transfers, the following guide covers the critical steps every shop or DIY creator should know.
Why Preparation Matters?
Heat transfers rely on the bond between adhesive, ink, and fabric. When a transfer doesn’t stick, cracks, or peels too soon, it’s rarely the fault of the design itself—it usually comes down to poor preparation or improper application.
Key reasons preparation is critical include:
- Durability: Ensures designs last through dozens of washes.
- Appearance: Prevents bubbling, misalignment, or uneven finishes.
- Efficiency: Reduces wasted garments and reprints.
- Consistency: Guarantees that each product in a bulk run looks identical.
By focusing on preparation, decorators save both time and money while delivering products that customers love to wear.
Step 1: Choose the Right Garment
Not all fabrics are equally suited for heat transfers. While cotton, polyester, and blends are reliable, garments with heavy waterproof coatings or extreme stretch can present challenges.
Considerations:
- Cotton and Cotton Blends: Excellent for adhesion, offering vibrant and long-lasting results.
- Polyester: Works well, but decorators must watch for dye migration on darker or sublimated fabrics.
- Stretch Fabrics: Spandex or Lycra may stress the transfer if the design doesn’t have stretch-friendly adhesive.
- Specialty Garments: Jackets with waterproof coatings often resist adhesion, requiring extra testing.
Always review garment tags and, if possible, test a transfer before committing to large runs.
Step 2: Inspect and Prepare the Fabric
Before pressing, garments need to be prepped to ensure the transfer adheres correctly.
- Check for Moisture: Fabrics can retain moisture from manufacturing or storage. A short pre-press of 3–5 seconds removes this moisture and flattens wrinkles.
- Clean Surface: Lint, dust, or loose fibers can prevent even adhesion. Use a lint roller to clean the pressing area.
- Smooth Out Wrinkles: A wrinkled surface creates gaps where adhesive may fail. Pre-pressing flattens the application area.
This simple preparation step reduces misprints and ensures smooth finishes.
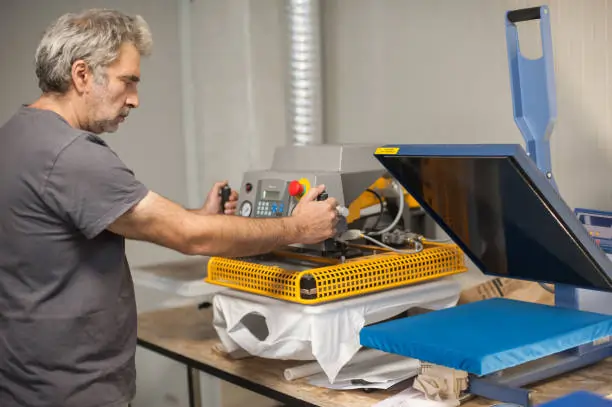
Step 3: Calibrate the Heat Press
A heat press is the backbone of the transfer process, and its settings must be correct to achieve optimal results.
Key Factors:
- Temperature: Each transfer type has a recommended temperature range, typically between 300–325°F. An infrared thermometer can confirm surface accuracy.
- Pressure: Consistent medium to firm pressure is often required. Uneven pressure can cause edges to lift.
- Time: Over- or under-pressing affects both adhesion and vibrancy. Stick to supplier guidelines.
Regularly maintain your press to avoid cold spots or inconsistent clamping. A poorly calibrated machine can ruin even the best custom heat transfers.
Step 4: Align and Position the Transfer
Proper placement is crucial for both aesthetics and customer satisfaction.
- Use Guidelines: Center rulers or placement templates help standardize design positioning across multiple garments.
- Check Symmetry: For chest logos, measure from the collar or side seam rather than “eyeballing” placement.
- Secure Before Pressing: Use heat-resistant tape if needed to keep transfers from shifting.
Good alignment prevents costly mistakes that are especially noticeable on bulk orders.
Step 5: Pre-Press and Apply Correctly
Pre-Pressing
Perform a short press before applying the transfer. This removes wrinkles and moisture, creating a stable base.
Application
- Follow exact temperature, pressure, and time specifications for the transfer type.
- Ensure the press closes evenly across the entire design.
- For multi-step applications (like hot peel or cold peel transfers), follow timing precisely to avoid damage.
Post-Pressing
Some decorators recommend a final press with parchment paper or a Teflon sheet. This seals the edges and enhances durability, especially for designs that will face frequent washing.
Step 6: Peel With Care
Depending on the transfer type, you’ll peel the backing either hot, warm, or cold. Peeling at the wrong time can stretch or lift the design.
- Hot Peel: Remove the backing immediately while still warm.
- Cold Peel: Allow the transfer to cool completely before peeling.
- Warm Peel: Wait a few seconds until the design sets but isn’t fully cold.
Always peel smoothly and steadily to avoid tearing fine details.
Step 7: Post-Press Quality Check
Once the transfer is applied, inspect the garment before packaging.
- Look for lifted edges or areas that didn’t adhere fully.
- Gently stretch the fabric to ensure adhesion.
- Verify that placement is consistent across the batch.
Catching mistakes early prevents dissatisfied customers and saves money on replacements.
Step 8: Care Instructions for Customers
The final step is educating customers on garment care. Even perfectly applied transfers can degrade prematurely if washed improperly.
Best practices to recommend:
- Wash garments inside out.
- Use cold or warm water instead of hot.
- Avoid bleach and harsh detergents.
- Tumble dry on low heat or air dry.
- Do not iron directly on the design.
By giving customers clear instructions, you help preserve both the quality of your work and your reputation.
Common Mistakes to Avoid
Even experienced decorators sometimes skip steps or overlook details. Here are common pitfalls:
- Skipping pre-pressing, leaving moisture trapped in fabric.
- Using incorrect press settings due to uncalibrated machines.
- Failing to clean garments of lint and dust.
- Misaligning designs due to rushed placement.
- Ignoring peel instructions specific to the transfer type.
Avoiding these mistakes ensures smoother production and happier customers.
Why Preparation Saves Money and Time?
Proper preparation reduces costly reprints, wasted garments, and unhappy customers. For businesses, this means:
- Higher efficiency: Faster runs with fewer errors.
- Customer trust: Consistent quality builds repeat business.
- Reduced costs: Less waste improves profit margins.
In an industry where margins can be tight, these savings make preparation just as important as creativity.
When to Test Before Full Runs?
For new garments or unfamiliar fabrics, always test one transfer before starting a full run. This step verifies:
- Fabric compatibility.
- Correct press settings.
- Color vibrancy and finish.
Testing adds a few minutes upfront but can save hours of wasted effort if adjustments are needed.
Conclusion
The secret to outstanding results with custom heat transfers isn’t just in the artwork—it’s in the preparation. By choosing the right garments, inspecting fabrics, calibrating the heat press, aligning transfers carefully, and following peel and post-press steps, decorators can achieve durable, vibrant, and professional-quality designs every time.
Preparation may feel like an extra step, but it ultimately saves time, reduces costs, and elevates the quality of finished products. Whether you’re running a small shop, outfitting a sports team, or handling e-commerce orders, disciplined preparation ensures your transfers perform as promised.
And for decorators who want to pair their transfers with garments that last, consider starting with durable blanks like Carhartt work shirts—an ideal foundation for long-lasting prints that customers will wear proudly.
Top Benefits of Timely AC Repair Service in Charles Town – Spiritual Meaning Portal
How to Prepare for a Civil Engineering Job Interview – Spiritual Meaning Portal